Finished size(s): To fit an average newborn (baby, toddler, preschooler).
Finished Measurements: 13.25 (15, 16.75, 18.25)” hat circumference.
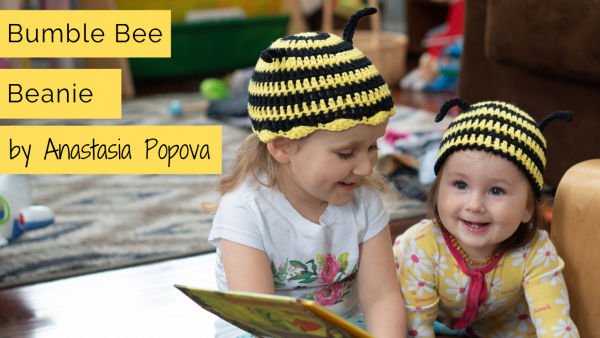
Yarn: Worsted weight yarn in yellow and black.
Sample Shown in: Lily Sugar ’n Cream (100% cotton; 120 yds [110 m]/ 2.5 oz [70.9 g]): sunshine (MC1) and black (MC2), 1 skein each.
Hook: US size H/8 (5.0 mm). Or hook necessary to obtain gauge.
Notions: Yarn needle.
Gauge: 12 sts and 7 rows = 4″ in double crochet.
Note of gauge: The hat is designed at a loose gauge to be cool and airy for the summer.
Notes: The hat is worked from the top down. Join each round with sl st.
Pattern Instructions
Crown
With MC1 make an adjustable ring.
Rnd 1: Ch 2 (counts as dc), 10 dc in center of the ring, sl st in top of ch-2. Pull tail to tighten the ring – 11 sts. Change color to MC2.
Rnd 2: Ch 2, *2 dc in each st around, dc in sl st, sl st in top of ch-2 – 22 sts. Change color to MC1.
Rnd 3: Ch 2, *dc in next st, 2 dc in next st; repeat from * 9 more times, dc in next st, dc in sl st, sl st in top of ch-2 – 33 sts. Change color to MC2.
Newborn size only: Rnd 4: Ch 2, *dc in next 3 sts, 2 dc in next st; repeat from * 6 more times, dc in remaining sts, sl st in top of ch-2 – 40 sts.
Baby, toddler, preschooler sizes Rnd 4: Ch 2, *dc in next 2 sts, 2 dc in next st; repeat from * 9 more times, dc in next 2 sts, dc in sl st, sl st in top of ch-2 – 44 sts.
Change color to MC1.
Infant size only: Rnd 5: Ch 2, dc in each st around, sl st in top of ch-2 – 40 sts.
Baby size only: Rnd 5: Ch 2, dc in each st around, dc in sl st, sl st in top of ch-2 – 45 sts.
Toddler old size only: Rnd 5: Ch 2, *dc in next 6 sts, 2 dc in next st; repeat from * 4 more times, dc in next 8 sts, dc in sl st, sl st in top of ch-2 – 50 sts.
Preschooler old size only: Rnd 5: Ch 2, *dc in next 3 sts, 2 dc in next st; repeat from * 9 more times, dc in next 3 sts, dc in sl st, sl st in top of ch-2 – 55 sts.
Sides
Change color to MC2.
Rnd 1: Ch 2, dc in each st around, sl st in top of ch-2 – 40 (45, 50, 55) sts. Change color to MC1.
Repeat rnd 1 – 2 (3, 4, 5) more times changing color at the end of every round.
Edging
Change color.
Reverse Single Crochet Edging
Rnd 1: Ch 1, reverse sc in each st around – 40 (45, 50, 55) sts.
Fasten off.
Shell Edging
Rnd 1: Ch 1, *skip next st, 5 dc in next st, skip next 2 sts, sc in next st; repeat from * around – 8 (9, 10, 11) shells.
Fasten off.
Antennas:
Holding two strands of MC2 together, ch 11, sl st in 4th ch from hook and each ch across. Fasten off leaving ends long enough for sewing.
Finishing
Using yarn needle and yarn tails sew antennas to the top of the hat. Weave in ends.
Written pattern copyright Anastasia Popova 2009, edit 2019, all rights reserved. Please do not reprint or repost this pattern, but please do link to this page to share this pattern with others.
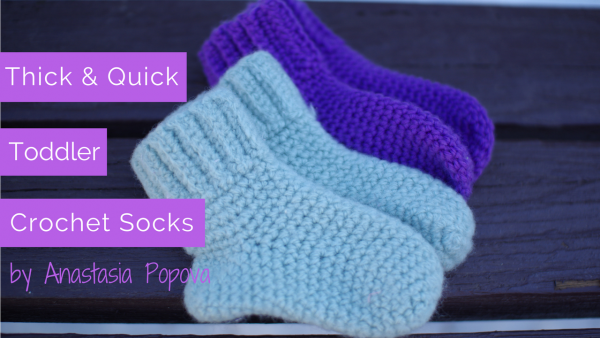
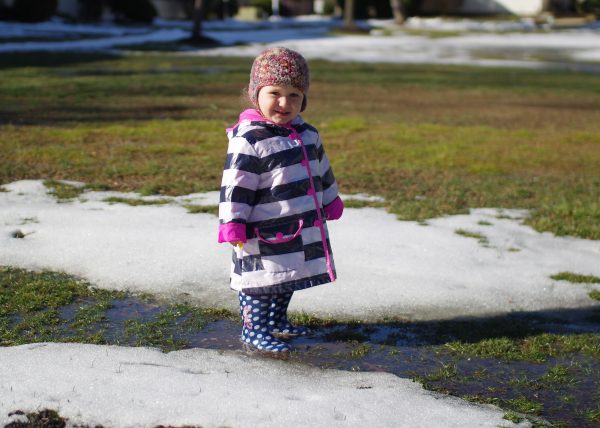
These toddler socks are worked in worsted weight yarn making them quick to crochet. Thick and warm socks are great for wearing in snow boots or rain boots or just like sleepers around the house. This pattern is suitable for beginners as it only uses single crochet and chains, you need to know how to read and count your stitches though as there are increases and decreases involved.
The socks are worked from the toe up. Increases are made for the gusset and then the heel opening is created. Then the sock is worked up to the ankle. The cuff is then worked sideways around the ankle and the side is seamed up afterward. We use back loop single crochet stitches for the cuff, which creates the stretchy fabric to make it easier to put them on. Lastly, the heel is worked into the heel opening.
HOOK: US size G/6 (4.25 mm), or size needed to obtain gauge.
NOTIONS: Yarn needle.
GAUGE: 9 sts and 10 rows = 2″ in single crochet.
VIDEO TUTORIAL
PATTERN INSTRUCTIONS
Toe
Ch 8.
RND 1: Sc in 2nd ch from hook and each ch across to last ch, 3 sc in last ch; working on the opposite side of the foundation ch, sc in next 5 chs, 2 sc in next ch – 16 sts.
RND 2: (Sc in next 7 st, 3 sc in next st) twice – 20 sts.
RND 3: Sc in next 8 sts, 2 sc in next st, sc in next 9 sts, 2 sc in next st, sc in next st – 22 sts.
Foot
RND 1: Sc in each st around.
Repeat rnd 1 – 10 more times, or until piece measures 2.75″ long from the foundation chain upwards.
Mark side sts: Lay sock flat to prevent it from twisting, place Ms on both sides of the sock to separate 10 sts between Ms on the bottom of the foot.
Next RND: (Sc in each st to marked st, 2 sc in marked st) twice, sc in remaining sts –24 sts.
Repeat rnd 1 – 2 more times.
Heel opening
RND 1: Sc in each st to market sts, ch 11, skip next 11 sts, sc in remaining sts – 24 sts.
Ankle
RND 1: Sc in each st around.
Repeat rnd 1 – 3 more times. Sl st in next st.
Cuff Ribbing
Note: Ribbing is worked sideways and attached to the sock at the end of every odd row.
Ch 9.
ROW 1: Sc in 2nd ch from hook and each ch across – 8 sts. To connect ribbing to the sock sl st into next two sts on the ankle (sl sts do not count as sts). Turn.
ROW 2: Working in back loops only, sc in each st across, turn.
ROW 3: Ch 1 (does not count as st), working through back loops only, sc in each st across. Sl st twice to connect ribbing to the sock, turn.
Repeat rows 2-3 around the ankle. Fasten off leaving 10″ long tail. With yarn needle sew the sides of the ribbing together.
Afterthought Heel
Place Ms at both corners of the heel opening. The first round is worked in the skipped sole sts, along opposite side of ch sts, and one extra st added at each M. With RS facing, join yarn anywhere along the edge of the heel opening.
RND 1: Sc in each st around – 24 sts.
RND 2: (Sc in each st to next M, sc2tog) twice, sc in remaining sts – 22 sts.
Repeat rnd 2 – 3 more times.
Last RND: (Sc2tog, sc in next st) around. Fasten off, leaving 10″ yarn tail.
FINISHING
With right side facing, flatten remaining heel opening, align stitches, and sew opening to close using mattress stitch. Weave in ends.
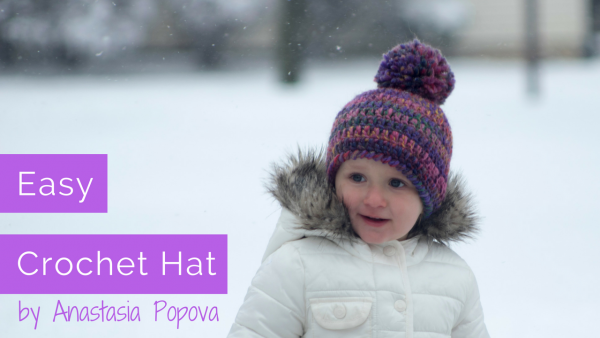
Hats are one of my favorite projects to crochet. This hat is easy and quick to make. It is worked from the top down in spiral rounds so there is no need for chaining or joining rounds with slip stitches. The hat starts with four rounds of increases and then is worked straight down. The main stitch used is double crochet stitch and the hat is edged with reverse single crochet. I am using bulky weight yarn so the hat is very quick to make.
The video tutorial shows how to crochet this easy hat step by step.
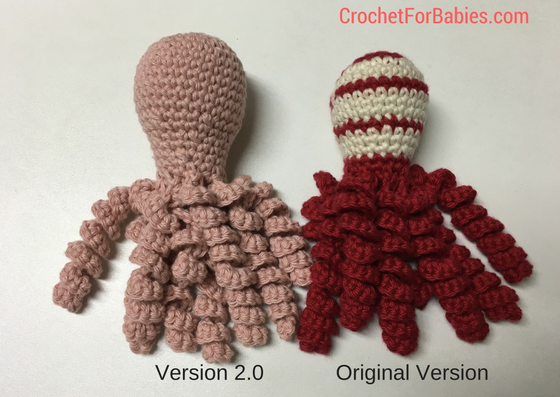
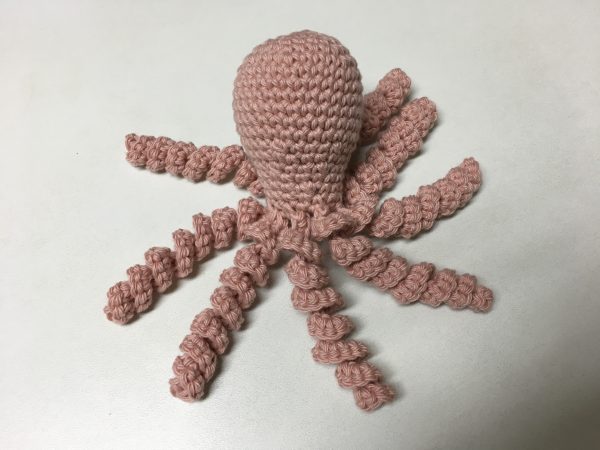
Wow! Thank You!! I am blown away by the response to my initial post and video about the Octo Project. I am glad to know it has touched so many people.
Based on the success of my original modified pattern I was inspired to create version 2.0.
This version uses the same yarn and the same techniques, however it creates a new variety of the octopus with a different body shape. Not better, not worse, but different. It is longer and a little wider. Variety is the spice of life crochet. So I proudly present octo 2.0.
Skills Required:
Basic stitches (single crochet)
Adjustable ring
Increases
Decreases
Crocheting in the round
Basic sewing
Finished Measurements: About 8″ tall. Head circumference is about 8″. Curled up tentacles are about 4-5″ long, fully stretched cannot exceed 8″ for safety reasons.
Yarn: Worsted weight 100% cotton yarn.
I would recommend not using mercerized cotton as it is treated with chemicals to make yarn shinier. I would also recommend not using yellow color for preemies (bad juju). I have used Sugar n’ Cream which can be purchased at any big box craft store. It’s inexpensive, readily available and comes in a lot of colors. It could be a little hard on your hands as it needs to be crocheted at a tight gauge. Another great option that I will mostly be using is Hobby Lobby’s I Love This Cotton, very soft, great color selection.
Sample Shown in: Lily Sugar ’n Cream (100% cotton; 120 yds [110 m]/ 2.5 oz [70.9 g]), and
I Love This Cotton (100% cotton; 180 yds [165 m]/3.5 oz [100 g]).
Hook: US size G/6 (4.25 mm). Or hook necessary to obtain gauge.

 Wow! Thank You!! I am blown away by the response to